You won’t find a lot of technical posts on this blog. That means when I do write about something technical then it must be good. Using Google Tag Manager for your website is good and it’s something you should look into.
There are many benefits you’ll see from using Google Tag Manager and there’s really no downside.
That may mean you’ll skip to the section on how to use Google Tag Manager. That’s OK though, it means I did a really good job convincing you quickly.
If you want to learn a bit more about Google Tag Manager before diving in then read on, you’ll learn what it is and why you should be using.
Oh yes, and then you’ll learn how to use it.
But first, what is Google Tag Manager and how is it different than Google Analytics?
What Is Google Tag Manager?
First, we need to start out by looking at what a tag is.
To properly run a website, information about visitors needs to be sent to third-party websites. It’s not possible to do everything in-house on the website’s server.
Tags are bits of code that go in your website code and send information about visitors back to a third party server. The problem is there are thousands of different tags and they can overwhelm a website.
To answer my own question about Google Tag Manager vs Google Analytics – Google Analytics is a tag and Google Tag Manager can be used to manage it.
There are thousands of different tags but Google Tag Manager makes managing them all easy. Share on XA tag can do a lot of things like helping you with remarketing, analytics, website optimization, surveys, or any number of other features that requires information to be sent from your website to another.
Some things tags do
Tags go by a lot of different names. Facebook calls theirs a pixel, Twitter has a universal website tag, LinkedIn has insight, and the list goes on. Those are all used for advertising.
Advertising isn’t the only purpose of tags though. The Google Analytics universal tracking code is, in fact, a tag which needs to be placed on your website to track visitors.
Even my customer relationship manager (CRM) has a tracking code that is considered a tag. Just make sure you’re disclosing all the tags you use and their purpose in your privacy policy.
So with the plethora of tags that need to go on a website and be managed, you can imagine how much of a mess these could all be for a website.
Every single one of these tags requires a snippet of code to be loaded into the website code. The more tags you have the more snippets of code have to be included in the code of your website. What a mess!
A website could easily have 10 tags clogging up each page and a web developers time.
Using Google Tag Manager lets you manage all these tags in one place and only put the tag manager code on your website.
The tag manager code is a one-time thing too so you don’t have to change anything each time you add or remove a tag.
Some of the more popular tags
There are infinite tags you can put into Google Tag Manager because it allows you to use custom HTML or a custom image.
There is a list of tags from third-party developers that makes them easy to use with Google Tag Manager though. The tag list in Google Tag Manager is a convenience but not a lock-in.
Here’s a list of some of the most popular of those tags:
- Universal Analytics (Google Analytics)
- Classic Google Analytics
- AdWords Conversion Tracking (did a visitors convert to a lead?)
- AdWords Remarketing (I want to market to them on the Google ad network)
- LinkedIn Insight
- Bing Ads Universal Event Tracking
- Twitter Universal Website Tag
And that’s not an exhaustive list, just the big ones!
Instead of managing 200 lines of code, you can minimize the code with just 11 lines of code (that even includes comments!)
That’s what Google Tag Manager is all about. If that’s not enough to convince you of the convenience of using Google Tag Manager then there are more reasons.
Why You Need It
There are a lot of benefits that come with using Google Tag Manager instead of individual tags.
Google points out a lot of Google Tag Manager capabilities on their website which also corresponds to reasons you need it.
A list of reasons you should be using Google Tag Manager
- Make changing tags easier – Google Tag Manager can be used on apps and websites. It makes it especially easy for apps because you won’t need to release a new version of an app to insert tags. Insert the tag manager once into the app and then manage all your tags from Google Tag Manager.
- Tag manager means more reliable tags – it makes it easy to test your tags to make sure they’re firing properly and aren’t messing up your website.
- Works with all tags – I can’t guarantee it will work with all but you can at least test to make sure it does. Google gives you many prepopulated third-party tag options but they also give you the option to use your own tag with HTML or an image.
- Let others manage your tags – you can delegate the management of your tags to anybody you’d like and they never have to touch your website code.
- More speedy – instead of having all tags load on every page you can make sure tags only fire on the page they need to and not on others.
Those are a lot of great reasons to use Google Tag Manager.
A tag manager makes it easy to update an app or website without getting too deep into code. Share on XIt has definitely changed the way I use tags. I now don’t feel guilty about using all the tags I need on my website. Previously I limited them for speed and ease of use but now I can be more intelligent about my use of tags.
Now you know why you need it, how do you get it?
How To Get It
Getting Google Tag Manager is easy and it’s even painless because it’s completely free.
Another amazing tool from Google that’s free for the basic version. The basic version is good enough for most bloggers, personal websites, and small businesses too.
If you have a Google account then just head over to the Google Tag Manager website and sign in.
Don’t have a Google account? (What rock have you been living under?) There’s a big green button on the tag manager website to sign up for a free account. Do that.
Once you log in to the website you’ll have to set your website up.
How To Set It Up
When you first sign into the Google Tag Manager site (you have to select the tag manager from the sign in drop-down menu) there will be a new account wizard.
You’ll have to enter your account name and your first container.
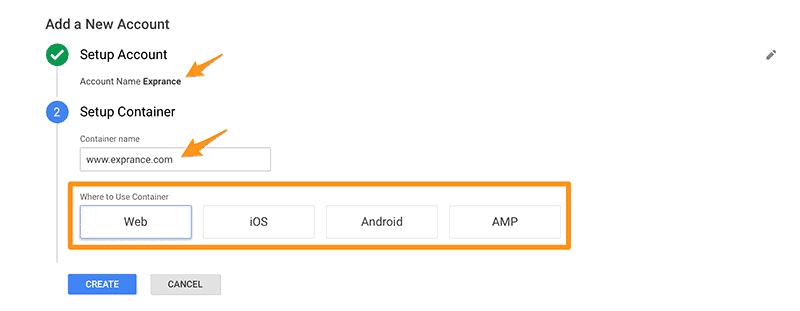
A container is an individual app or website that you want to install the tag manager on. You can have lots of different containers if you run multiple websites or subdomains so start with the most important first.
You’re going to have to agree to the terms of service also.
Now it’s time to install the code for your container of your Google Tag Manager.
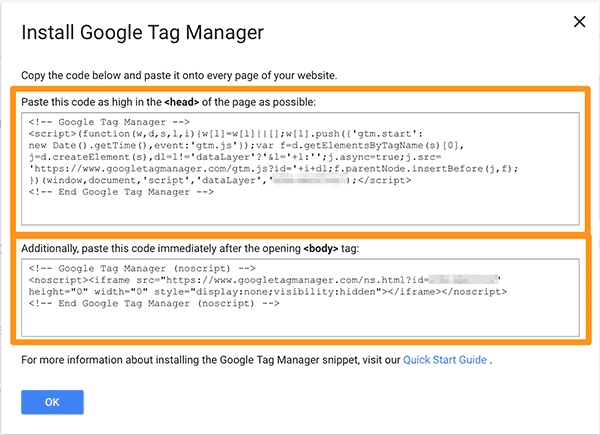
You’ll have to install each section of this code where it says. So, the first one goes as high in the <head> tag as possible of every page of your website.
The second goes immediately after the <body> tag on every page of your website.
There are plugins you can use for WordPress to make this easier but a plugin shouldn’t be necessary. You’re trying to clean up your website anyway not clutter it up with more plugins.
Now you need to set up your first tag.
Set up your first tag
I’m going to focus on adding Google Analytics because that’s the most common tag everyone needs.
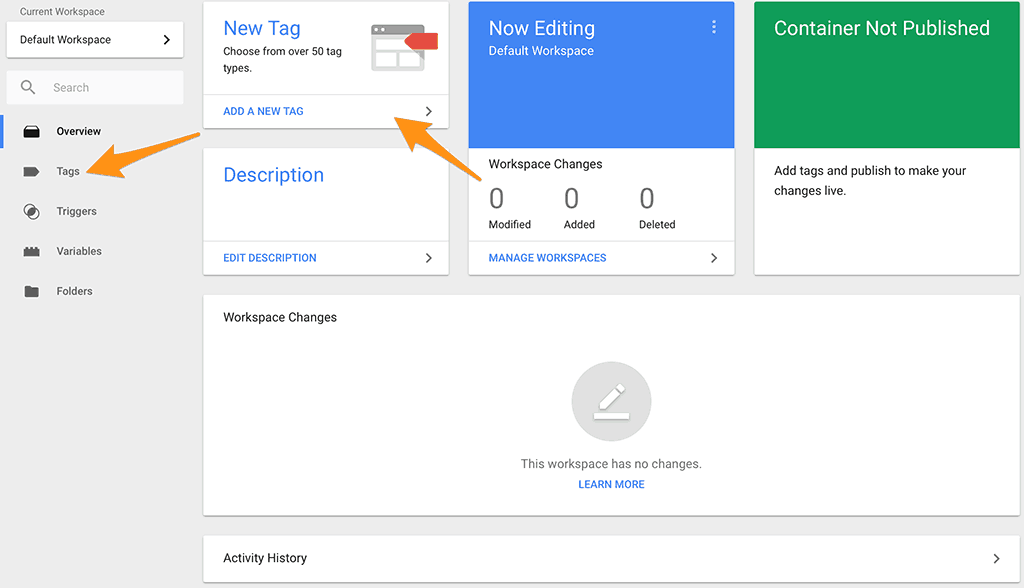
You can add a new tag by clicking the add a new tag link in the new tag section or by going into the Tags folder.
The next screen has two sections that you’ll need to complete. The first section is the tag configuration which lets you choose the type of tag and configure it.
Next is the trigger which is where you want this tag to fire. For Google Analytics you want it to fire on every page. If you’re creating a tag for AdWords Conversion Tracking then you would only want it to fire on a page that means a visitor converted.
The steps of creating a tag
I’m going to reference the steps of this image for a bit.
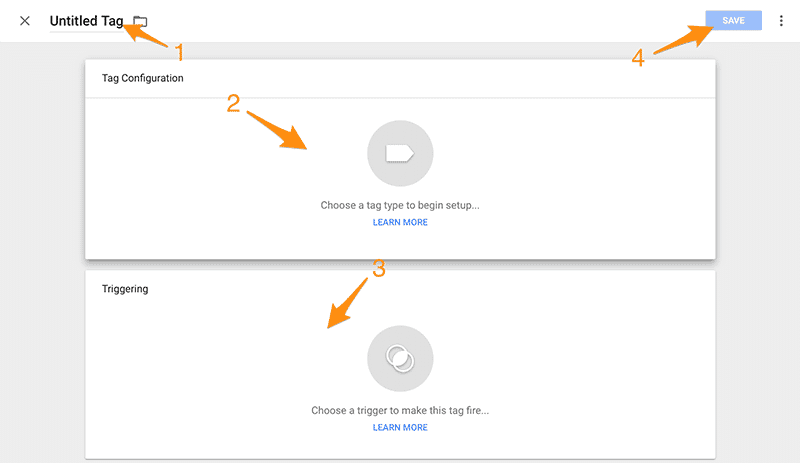
You’ll first want to name your tag. For this one you can name it Google Analytics, that’s step number 1.
Next is the 2nd step which is to create the tag. Click anywhere on the tag box to create a new tag and choose Universal Analytics (or classic if you’re still using that).
Now things get a little more complex and I’m not going to get into all the specifics of setting up Google Analytics.
Google has a great help document here that tells you all the specifics of setting up the Universal Analytics tag.
Once you get that done you have to set up a trigger to tell Google Tag Manager when to fire the Universal Analytics tag.
With a tag manager you can trigger tags to only fire on a specific page of your website. Share on XYou can click anywhere in the triggers box for step 3. You’ll want to select All Pages and then save your tag (step 4).
That’s it for setting up your first tag! Now you need to publish the tag for it to work on your website.
Publish your container
It’s always good to preview your changes before you publish them. I’m going to leave the details of previewing to the troubleshooting section below though.
To publish your tags after you’re finished adding them simply click the submit button (big blue button in the top right).
You’ll get to name the version and describe what’s in it.
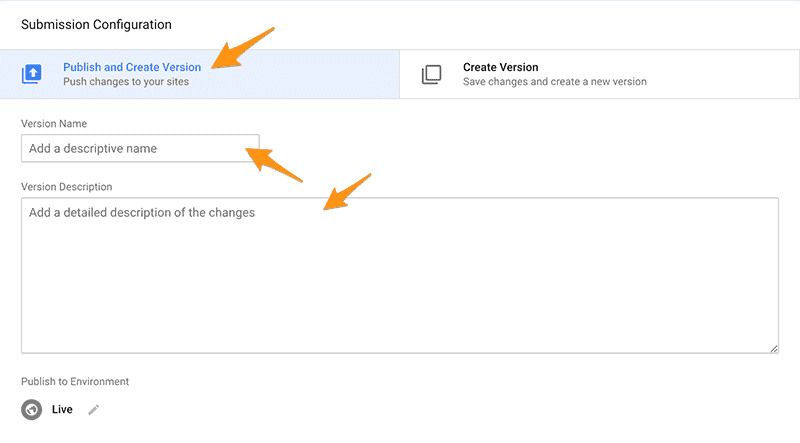
If you create a version, name it, and then describe the changes then it’s easy to see what was changed in the tag manager to see where to roll back if something goes wrong.
So, it’s always better to name your version and describe everything that was changed.
That’s it! Your tags are published and they should now work.
What if you don’t want to do all that work and you want someone else to manage your tags? Google has you covered!
Delegating Access To Others
If you’re a busy entrepreneur off to the next big thing then you don’t have time to manage all these tags. Your job is your business not everything else right?
Either that or you have a web guy and a separate marketing company who manages your advertising, analytics, and website goals.
You can delegate access to each part of Google Tag Manager to another user.
Google Tag Manager lets you delegate either an entire account (with multiple containers) or a single container. It’s up to you.
From anywhere in Google Tag Manager you can go to the admin section. The admin section is accessible from the gear icon on the main account screen or the admin tab from any workspace.

Now you can use the User Management section for either the account (left side) or the container (right side) to manage who gets access.
You’ll need the email address of the user you want to delegate access to and you’ll also need to give them proper access.
Don’t give someone publish ability for an entire account if they only need to look at a container.
You can let users:
- Read
- Edit
- Approve
- Publish
Those should give you the ability to give each user only the access they need and no more.
You can give a marketing company full publish access or perhaps your boss approve access.
What if something goes wrong and all your tags stop working?
Troubleshooting Tags
Sometimes things go wrong. What happens if a tag won’t fire that should?
There are some built-in features when you’re using Google Tag Manager that makes it easy to troubleshoot tags gone wrong.
Test before deploying
Yes, you can test a tag before you publish the workspace to your live site. In fact, you need to do this every time you add a tag before you do the final publish.
You may have noticed a grey preview button next to the submit button. That’s how you test your tags before publishing.
Click that button to get into the testing screen.

Once you have the testing mode open (the big orange box shows up on your workspace) you can open a new tab in your browser and head over to your website.
If you have your website open already then refresh it and you’ll see a new pane open at the bottom of your browser window.

This gives you an overview of which tags are firing on any given page and which tags are not.
There’s one tag that’s not firing on my homepage though. That’s because I set that tag to only fire on one page of my website. If I head over to the page then it fires as it should.
There’s a lot more I can view in this debug screen also if I explore some of the tabs. I can see variables that are being passed to Google Tag Manager in the variables tab.
Good stuff!
Once you’re done previewing your workspace you can leave preview mode and then publish your workspace if it works as it should.
Google Tag Manager makes it easy to see if tags are working before publishing them. Share on XIf things don’t work as they should then it’s back to the drawing board you go!
What if you messed something up somewhere along the way? That’s what version control is for!
Use versions to easily roll back changes
Sometimes you can’t get every problem ironed out even in preview mode. There’s always something that sneaks by and you find out about later.
Versions are the perfect solution for that because you can roll back your changes if something goes wrong. You can even skip a few versions to undo several changes.
Versions are also good reasons for you to name your versions and give them good descriptions every time you publish.
When you’re in a workspace you just have to click on the versions tab to see all the version you’ve saved.
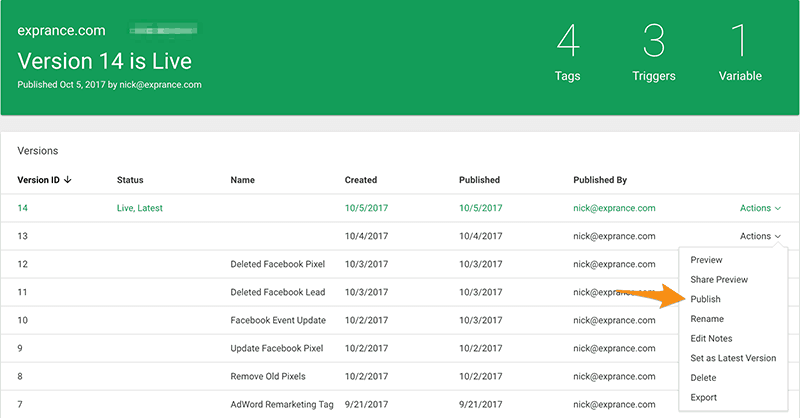
You can use versions so you can roll back changes easily for each change you made. Every version on the versions tab has an actions menu.
You can preview previous versions on your website to see how that one worked and you can publish them too. In fact, you can do a lot of really neat things with previous container versions.So take some time to play with the different options.
So take some time to play with the different options.
That’s it, you’re now an expert at setting up and using Google Tag Manager. Maybe not an expert because there’s a lot more too it but you have a really good picture of what it’s all about and how to use it.
If you want a super brief overview video of what Google Tag Manager is then check this video out from Google:
Simplify Your Life
Google Tag Manager is a great way to simplify managing all the tags needed to properly manage a business website. It adds an additional level of separation between the code of a website and people who are only dealing with analytics and advertising.
It all comes down to tracking the right data, analyzing it, and making the necessary changes to get more conversions. Google Tag Manager makes it a whole lot easier.
Do you know if your online presence is performing like it should be? Your digital marketing should be helping your business get more customers.
Get a free Online Presence Report to see how your marketing strategy is looking online. It may be time to work with a digital marketing agency who knows how to grow your online presence to get you more customers.